Setting up for X-Windows Development on MacOS
This note describes setting up a development environment for doing X Windows Development on Mac OS from the ground up. The notes do apply to other environments… with minor tweaks (I tried the same basic setup on Debian Linux, DragonFly BSD, and FreeBSD with no major issues).
This is enough setup to build applications in X Windows using Xlib - the lowest level of programming in X… other than the X Protocol :). I did this because I have developed an interest in how graphical interfaces work and X, for all its quirks, is not self-limiting, crippled, partially proprietary or any of that nonsense and it is widely used.
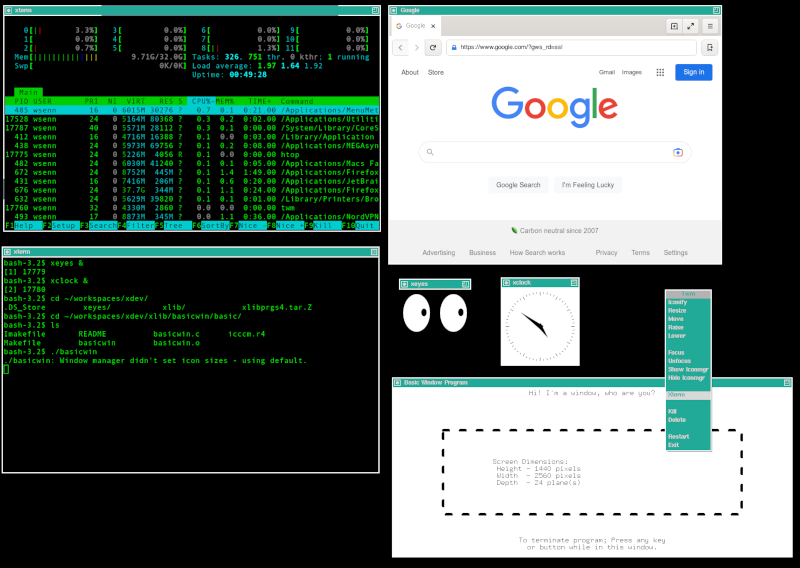
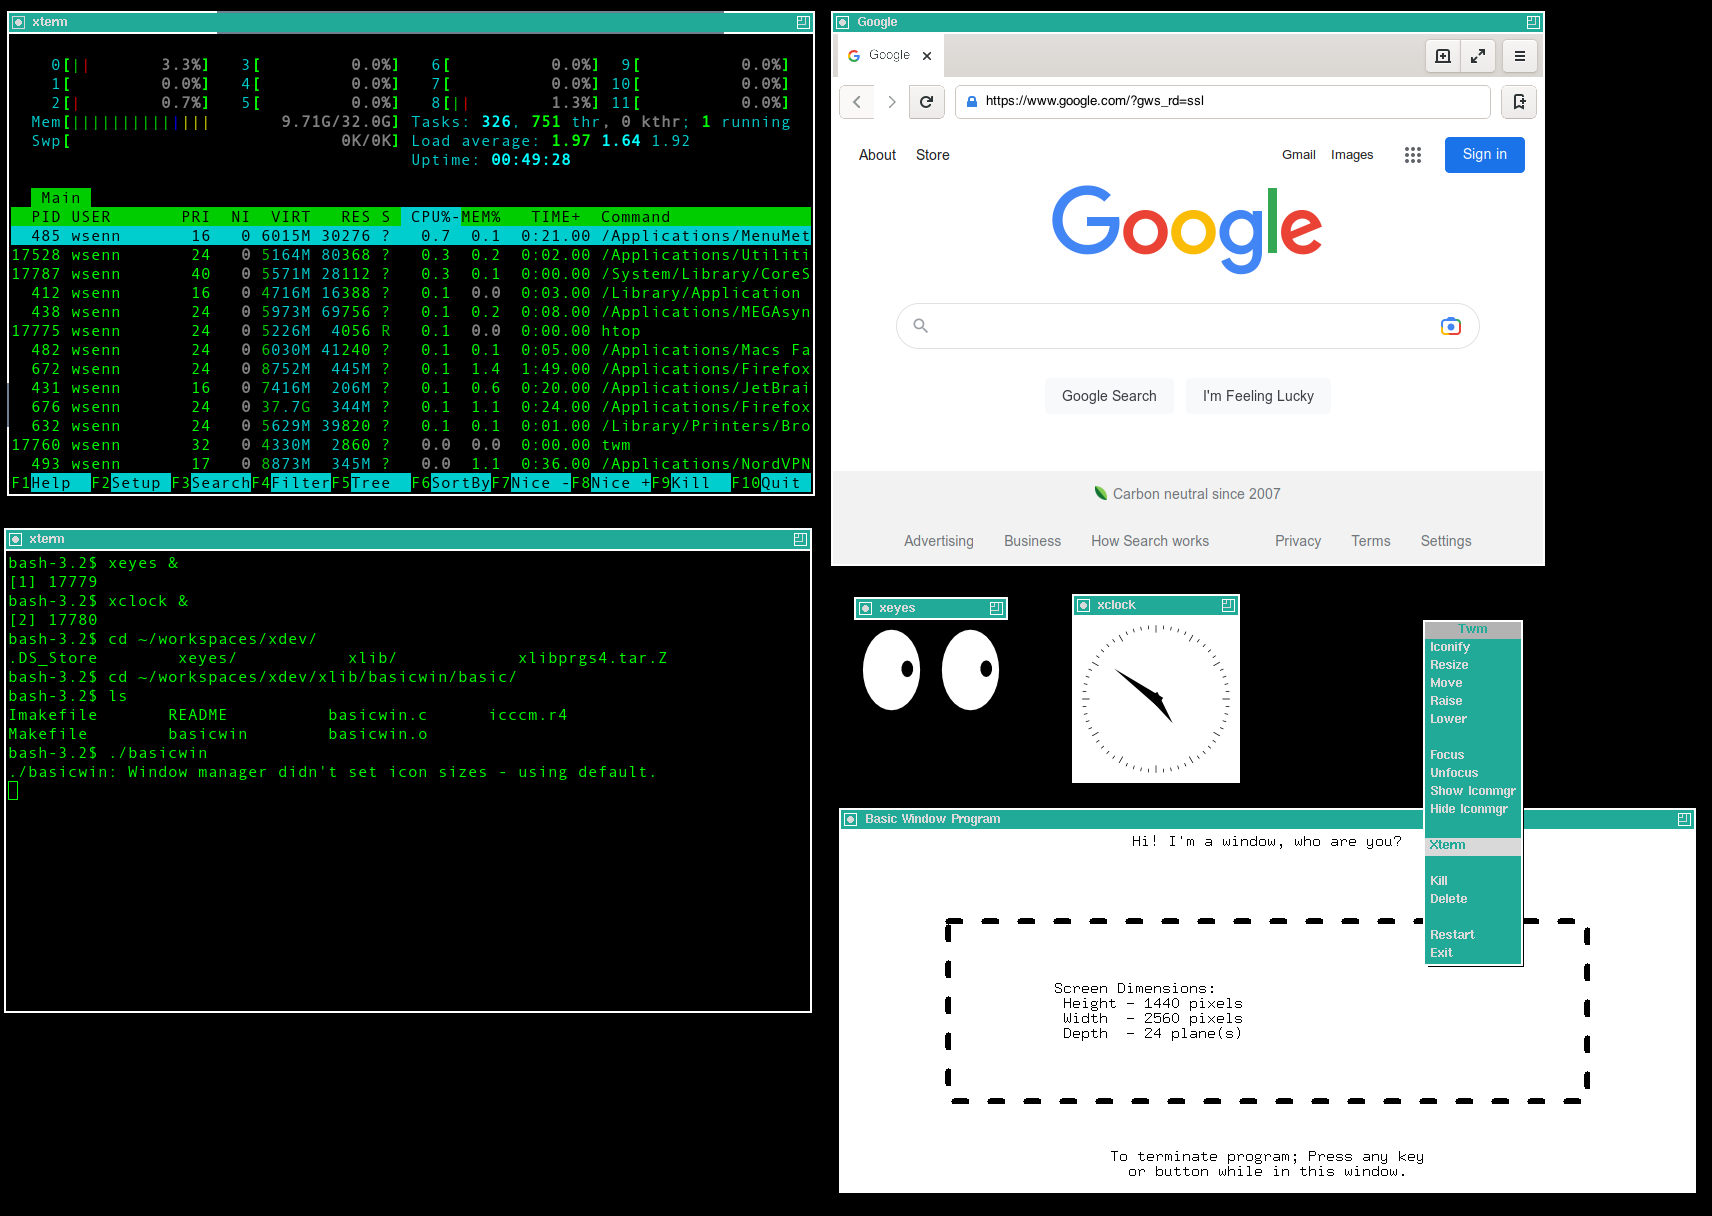
After setting up, downloading some source, building and deploying, here’s what we’re looking at… on a Mac:
Resources
- XQuartz - https://www.xquartz.org
- XQuartz Developer Information - https://www.xquartz.org/Developer-Info.html
- MacPorts - https://www.macports.org/install.php
- X.org Foundation - https://www.x.org/wiki
- Xlib Programming Manual R5 3rd Edition Example Files - https://resources.oreilly.com/examples/9781565920026
- Xeyes source code - last updated a year or so ago - https://gitlab.freedesktop.org/xorg/app/xeyes
System Requirements
- MacOS - I’m running this on Mojave, but have tested it on Monterrey as well
- XQuartz - I’m running 2.8.4
- Macports - I’m running 2.8.0
- Some code to run in X - I’m using xeyes from X itself and basicwin from Volume One of The Definitive Guides to the X Window System: Xlib Programming Manual for Version 11 R4/R5 by Adrian Nye
Getting MacOS Ready
There are only a few small steps to take to prepare MacOS for doing X Windows development:
- Install XQuartz
- Install MacPorts (to satisfy any dependencies and fill tool gaps like imake)
- Install imake
- Configure and Test XQuartz
- Build xeyes and basicwin
- Celebrate
1. Install XQuartz
Head over to https://www.xquartz.org and download the install package. Run it. Logout as advised when install is complete and log back in.
2. Install MacPorts
Browse to https://www.macports.org/install.php and grab an installer for your version of MacOS. Run it.
3. Install imake
Open terminal and type sudo port install imake to install it.
4. Configure and test XQuartz
Start XQuartz (it’s in /Applications/Utilities)
- Open Preferences
- Click Input
- If you need 3 button mouse emulation (trackpad), Check the box
- Check Enable key equivalents under X11
- Click Output
- Check Full-screen mode and Auto-show menu bar in full-screen mode
- Click Pasteboard and enable any helpful settings you like
Note: When you enable full-screen mode, your x windows will appear on a separate desktop. This is different behavior than you will be used to if you have already been using X on your Mac, but it’s more in line with a typical x windows environment this way
Investigating the XQuartz startup file situation
I wanted to use twm as the window manager instead of quartz-wm. So, I made some additional changes to the startup environment.
Finding xinitrc
On Mac OS, XQuartz provides the X11 environment (the server and many of the clients). The server is configured via xinitrc. This file can be found using find:
find /opt -name xinitrc
/opt/X11/etc/X11/xinit/xinitrc
Looking at the delivered xinitrc
A look at this file shows that it provides a mechanism for customization using an .xinitrc.d directory:
cat /opt/X11/etc/X11/xinit/xinitrc
#!/bin/sh

userresources=$HOME/.Xresources
usermodmap=$HOME/.Xmodmap
sysresources=/opt/X11/etc/X11/xinit/.Xresources
sysmodmap=/opt/X11/etc/X11/xinit/.Xmodmap

# merge in defaults and keymaps

if [ -f $sysresources ]; then

    if [ -x /usr/bin/cpp ] ; then
        xrdb -merge $sysresources
    else
        xrdb -nocpp -merge $sysresources
    fi


fi

if [ -f $sysmodmap ]; then
    xmodmap $sysmodmap
fi

if [ -f "$userresources" ]; then

    if [ -x /usr/bin/cpp ] ; then
        xrdb -merge "$userresources"
    else
        xrdb -nocpp -merge "$userresources"
    fi


fi

if [ -f "$usermodmap" ]; then
    xmodmap "$usermodmap"
fi

# start some nice programs

if [ -d /opt/X11/etc/X11/xinit/xinitrc.d ] ; then
	for f in /opt/X11/etc/X11/xinit/xinitrc.d/?*.sh ; do
		[ -x "$f" ] && . "$f"
	done
	unset f
fi

twm &
xclock -geometry 50x50-1+1 &
xterm -geometry 80x50+494+51 &
xterm -geometry 80x20+494-0 &
exec xterm -geometry 80x66+0+0 -name login
I have included the entire file because it is worth seeing, but the relevant portion is at the end of the file:
if [ -d /opt/X11/etc/X11/xinit/xinitrc.d ] ; then
	for f in /opt/X11/etc/X11/xinit/xinitrc.d/?*.sh ; do
		[ -x "$f" ] && . "$f"
	done
	unset f
fi
This snippet looks in /opt/X11/etc/X11/xinit/xinitrc.d for any .sh files and runs them.
Looking in the /opt/X11/etc/X11/xinit/xinitrc.d directory
To see what’s going on, take a look at the directory:
ls /opt/X11/etc/X11/xinit/xinitrc.d
10-fontdir.sh	98-user.sh	99-quartz-wm.sh
They’re each interesting in their own right, but the one we’re interested in is 98-user.sh. Let’s take a look at it:
cat /opt/X11/etc/X11/xinit/xinitrc.d/98-user.sh
if [ -d "${HOME}/.xinitrc.d" ] ; then
        for f in "${HOME}"/.xinitrc.d/*.sh ; do
                [ -x "$f" ] && . "$f"
        done
        unset f
fi
Well, that looks familiar. It appears that it looks for a .xinitrc.d folder in the users directory and runs any .sh files it finds. That’s our hook for running twm.
Setting twm as the window manager
To set twm as the window manager requires us to create a startup file and give it execute permission:
mkdir -p ~/.xinitrc.d
cat <<EOF > ~/.xinitrc.d/99-wm.sh
#!/bin/sh
exec twm
EOF
chmod +x ~/.xinitrc.d/99-wm.sh
Test twm
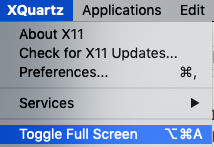
Close XQuartz if it is currently running so that it will pick up the changes you have made up to this point and reopen it. To change to the desktop, ensure that XQuartz has the focus (click on it) and type the three key combination Command-Option-a or from the menu, select XQuartz->Toggle Full Screen:
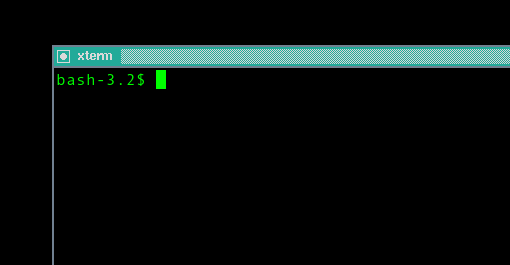
Your screen should switch to twm. Position your mouse somewhere near top left to position the xterm window:
To switch between your x windows session and MacOS, just press Command-Option-a or move your mouse to the top of the screen and from the menu, select XQuartz->Toggle Full Screen.
Your X Windows will continue running until you either exit twm, or close XQuartz. The proper way to do it is to close any running application and exit twm. In order to close open applications, you can type CTL-d to close the applications input (works for terminal and a lot of unix utilities) or use the kill command from the twm menu. To bring up the twm menu, left click on the desktop, outside of any window, while in X Windows, and the twm menu will appear:
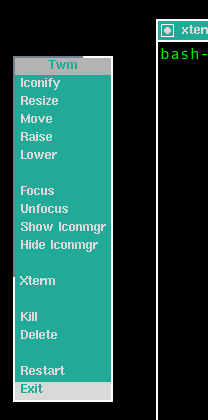
To exit twm, bring its menu up and click exit.
Note: Occasionally, in my experience, if you don’t exit twm cleanly, it will display a phantom window frame on the screen when you start it up (no big whoop, but annoying). So, exit correctly or ignore the cruft.
Read more about twm at https://www.oreilly.com/library/view/x-window-system/9780937175149/Chapter03.html
From now on, we will be running any x applications in twm. Just note that they will also work fine in xquartz-wm and appear to be more integrated with MacOS, then. We can build our apps in a regular MacOS terminal and enjoy easy cut and paste, but let’s run the apps in xterm.
5. Build xeyes and basicwin
Now that we have a working X Window environment to explore let’s try building a couple of apps. First, let’s build my all time favorite X client, xeyes.
Get the xeyes source
cd ~/sandboxes-git
git clone https://gitlab.freedesktop.org/xorg/app/xeyes
cd xeyes
Build xeyes from source
I won’t apologize for this next bit, suffice it to say that some sorcery is involved… and glomming the XQuartz Developer Information page at https://www.xquartz.org/Developer-Info.html. The instructions there are way out of date, but they do give a hint as to how to set up your environment for building X applications from the X.Org distribution (of which xeyes is part).
That said, I will apologize, in advance, if your build fails due to missing dependencies (like autoconf). I have been running this system for a while and I do a lot of development on it, so I probably have already installed some of the dependencies (how would I know, right?). Anyway, if you do hit a notice that you are missing a library or dev tool, just sudo port install it.
Now, without further ado, let’s build xeyes:
export ACLOCAL="aclocal -I /opt/X11/share/aclocal"
export PKG_CONFIG_PATH="/opt/X11/share/pkgconfig:/opt/X11/lib/pkgconfig"
export CFLAGS="-Wall -O0 -ggdb3 -arch x86_64 -pipe"
export OBJCFLAGS=$CFLAGS
export LDFLAGS=$CFLAGS
autoreconf -fvi
./configure --prefix=/opt/X11 --disable-dependency-tracking
make
These commands tell autoreconf, configure, and make, respectively where to find pkgconfig, aclocal, etc., and then execute the command to build the app.
If all is well in the world, you should see:
Making all in man
  GEN      xeyes.1
  CC       Eyes.o
  CC       transform.o
  CC       xeyes.o
  CCLD     xeyes
and, the file xeyes should now be present in the directory:
ls -l xeyes
-rwxr-xr-x  1 wsenn  staff  30944 Jan 24 18:34 xeyes
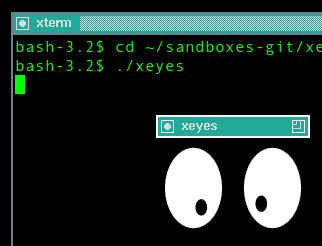
Yay, let’s run it. Switch over to your twm and open an xterm. In the xterm window, run xeyes:
cd ~/sandboxes-git/xeyes
./xeyes
Get the basicwin source
OK. That was fun, but we need to get closer to our goal of doing Xlib development. Let’s build basicwin from the Xlib Programmer’s Manual.
mkdir -p ~/sandboxes-git
cd ~/sandboxes-git
git clone https://resources.oreilly.com/examples/9781565920026.git xlib-pm
Create a temporary location for our source code
mkdir -p ~/work
cd ~/work
tar xvf ~/sandboxes-git/xlib-pm/xlibprgs4.tar.Z
cd xlib/basicwin/basic
Build basicwin from source
Unlike xeyes, above, we don’t need any special incantations to make this next part work. We can follow what Adrian Nye wrote nearly 30 years ago:
xmkmf
make
If all went well, we will see something along the lines of:
19 warnings generated.
rm -f basicwin
/usr/bin/cc -o basicwin -Os -Wall -Wpointer-arith -no-cpp-precomp     -L/opt/local/lib   basicwin.o -lXext -lX11
Nevermind the warnings, a lot has changed with our c environment over the years. The good news is we now have a new executable:
ls -l basicwin
-rwxr-xr-x  1 wsenn  staff  14792 Jan 24 18:48 basicwin
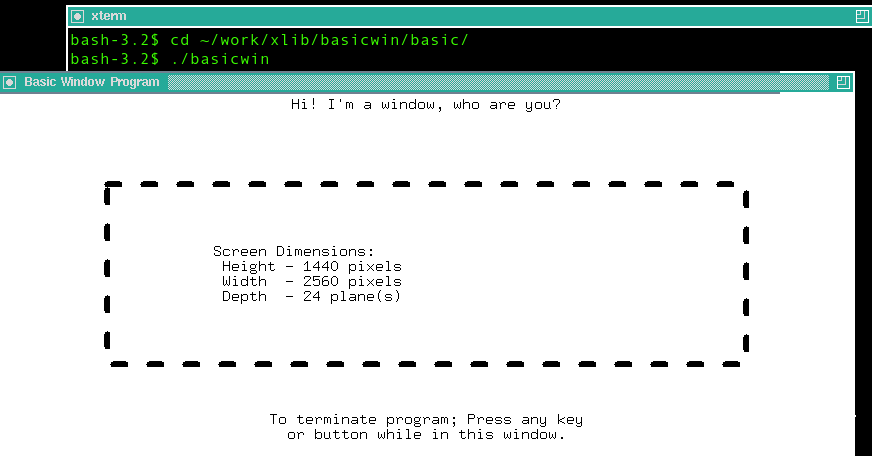
Switch over to twm, open a new xterm, and run it:
cd ~/work/xlib/basicwin/basic
./basicwin
6. Celebrate
Yeeha! That’s worth celebrating. Next, tweak that basicwin source code. get a book on Xlib and really dig in, get one on XT, get one on Motif, go crazy and read up on QT and GTK+, just have fun. I’m just getting started, so it’s all new to me. I’m planning = to start with Xlib and work my way up the stack.
Some extras
The more observant folks prolly wondered a few things:
- Where did that browser come from in the cool screenshot?
sudo port install midoriMidori rocks! Super fast and runs in X. I use it over ssh all of the time - firefox is great, but it sucks over the network. Not so midori!
- Same question for the other app?
sudo port install htophtop is a pretty process monitor for terminal (and xterm).
- How did he capture those screenshots.
This took quite a bit of trial and error. Folks on the web recommend using
xwd, I couldn’t get it to grab the right window (the desktop) no matter what incantation I gave it. What did work was Mac OS’s built inScreenshot.appapplication. I just gave it a 10 second timeout, chose the select window option, clicked Capture, and then speedily opened twm and waited for the timeout to occur.
Links to high res images:
post last updated 2023-02-13 21:02:00 -0600