Sculpt 22.10 - A Truly Alternative OS
This note is about installing and running Sculpt OS 22.10 in VirtualBox.
SculptOS is an operating system built out of components provided by the Genode Operating System Framework and as such it qualifies as a truly alternative operating system. These days, that’s quite a feat. Most ‘alternatives’ are linux distros or flavors. This OS runs on a microkernel - Nova or any one of several other choices. It is decidedly not unix, windows, linux, haiku, beos, os/2 or any other mainstream os.
Sculpt OS is made so that it is relatively straightforward, if not easy, to provide a secure computing environment where applications and services are built on a Trusted Computing Base… that is an application is provisioned explicitly to depend on a tree of components that are known to be trustworthy, and are sandboxed. It is similar in some ways to Qubes OS, but significantly different in others.
The learning curve is steep. So, as I explore the environment and learn more about it, I’ll post more of these notes.
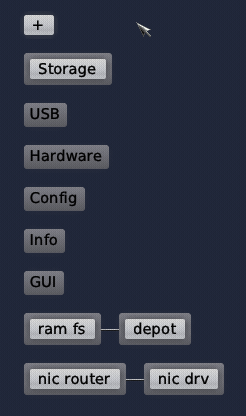
Here’s the OS running stuff.
Resources
- Genode Operating System Framework Website https://genode.org/
- Genode OS Framework 22.05 Foundations Document html pdf
- Sculpt OS 22.10 Documentation html pdf
- Mailing List https://genode.org/community/mailing-lists
- Genodians - Stories around the Genode Operating System https://genodians.org/
- Git repository - https://github.com/genodelabs/genode
Prerequisites
- Host system - Mine is 2010 Mac Pro running Mojave
- VirtualBox w/extension pack - I’m running 6.1.40
Download the Sculpt OS Virtual Appliance
While it may be possible to do a full installation of Sculpt OS via the standard installation ISO, the recommendation is to use the virtual appliance as it’s preconfigured optimized for running in VirtualBox.
Method 1 - Downloading in your browser
- Browse to https://genode.org
- Click the Download Button
- Click the Pre-built Sculpt OS images hyperlink
- Scroll Down to the Running Sculpt as VirtualBox appliance section
- Click the sculpt-22.10.ova link to download
- Click the signature link to download
Method 2 - Using Aria/curl/wget to Download Directly
 aria2c https://genode.org/files/sculpt/sculpt-22-10.ova
 aria2c https://genode.org/files/sculpt/sculpt-22-10.ova.asc
Check the signature
gpg --verify sculpt-22-10.ova.asc
...
gpg: Good signature from "Genode Labs Depot 17.05 <depot@genode.org>" [unknown]
...
Import the ova into VirtualBox
-
In the file explorer, double click on the Sculpt-22.10.ova file
-
Read through the Appliance Settings, and click Import
-
Acknowledge the AGPLv3 license, and click Agree
-
Genode - Sculpt 22.10 will appear as a new VM in the VM Manager
Run Genode
- Click Start in the VM Manager to run Genode
- See the Genode Splash Screen
- See the Genode Leitzentrale (German for Control Center)
That’s it to get it running. The trick is in using it.
Using Genode
In the note, we are going to perform a number of steps to learn about Sculpt. This isn’t a particularly useful system, but it will suffice to illustrate some key concepts present in Sculpt and the Genode Framework.
Steps we will undertake
- Learn about Leitzentrale
- Set up storage
- Set up networking
- Set up genodelabs repository
- Download a desktop background and configure it
- Download a window manager and configure it
- Download a demo and configure it
- Download a fontfs and configure it
- Download a unix-like system shell and configure it
- Celebrate a job well done
1. Learn about Leitzentrale
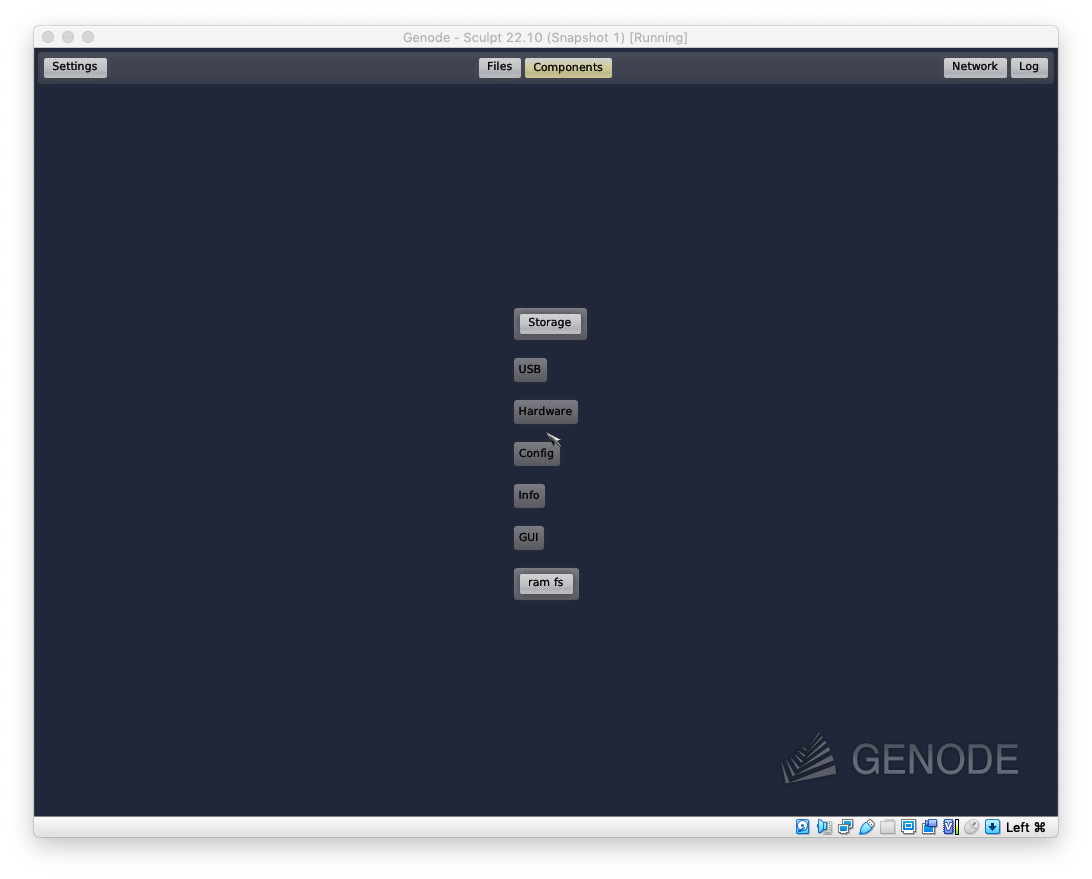
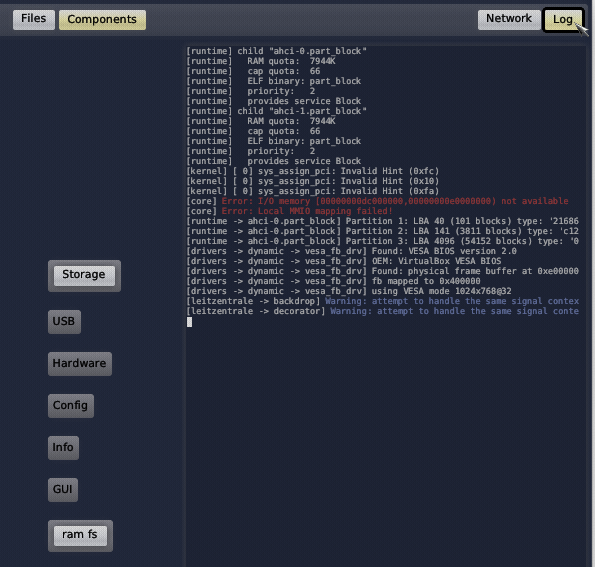
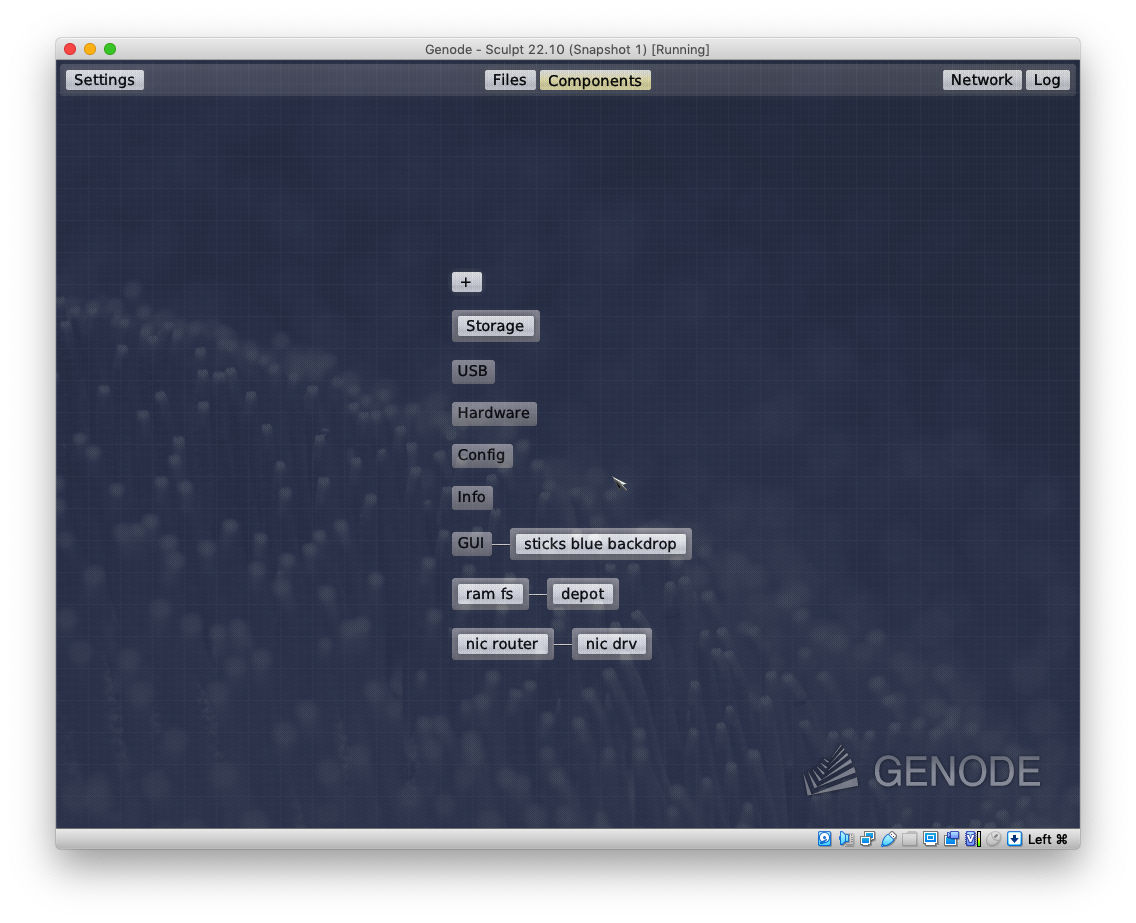
Sculpt is running and we are seeing Leitzentale, the control center. This is where we set things up and see the relationships between active components.
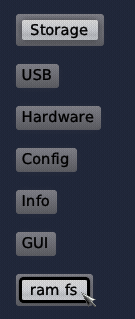
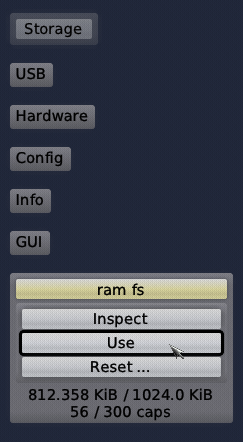
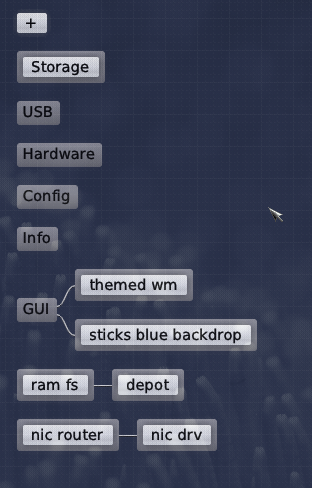
Right now, the screen is showing us 5 buttons along the top - Settings on the left, File and Components in the center, and Network and Log, on the right. A vertical stack of 7 buttons in the center of the screen - Storage, USB, Hardware, Config, Info, GUI, and ram fs.
The buttons are show in 4 states - Yellow is active with the focus, medium gray is capable of being selected, Light gray is only in the vertical stack and shows what is present in the system and capable of being selected, dark gray is not capable of being selected.
Clicking on one of the buttons allows us to do work in the control center:
-
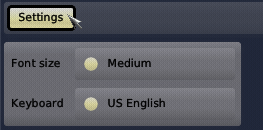
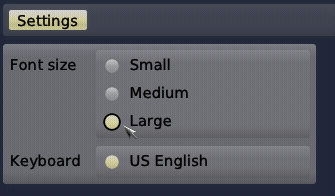
Settings - Change the Font size and the Keyboard Language
-
Files - view the system as files

-
Components - the default view
-
Network - configure the network
-
Log - view the system log in split-pane
The only change I am going to make is to increase the font size to make it easier to read the buttons and such.
Settings->Font size->Large
2. Set up storage
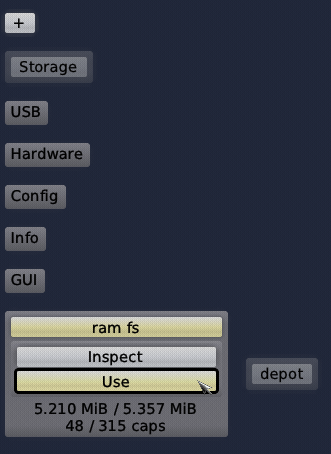
In this step, we could choose one of the drives that are attached to the VM, but instead, we will choose the ramfs as it is available and will disappear when we are done, which is convenient in this case.
ram fs
Then click Use.
ram fs->Use
After you pick Use, the system will briefly display a Preparing button. After the Preparing button disappears, you will be left with a Depot button, showing that a depot is available on the ram fs. A depot is a location for storing downloaded assets and is needed for the system to be able to download applications. You should notice that a + sign has appeared at the top of the stack of buttons in the center of the screen.
Click on the ram fs button to close the opened view.
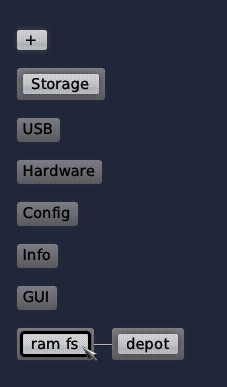
As you can see, depot is dependent on ram fs.
3. Set up networking
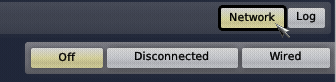
To configure networking, just click Network and Wired.
Network->Wired
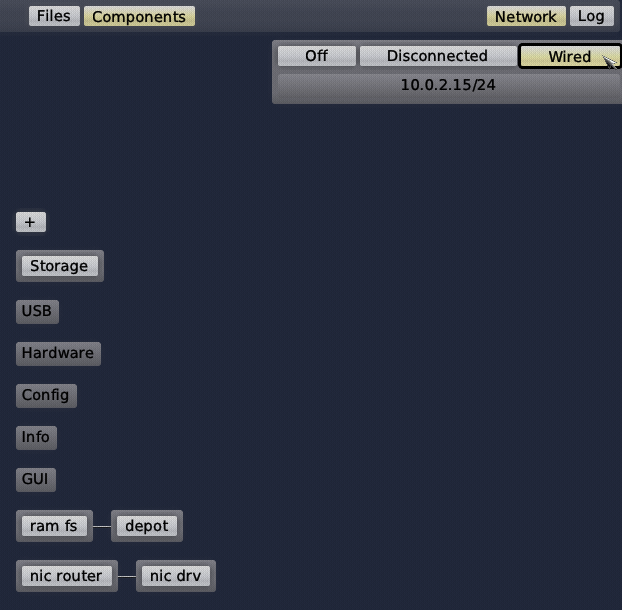
It takes a couple of seconds for the nic to configure. Once the nic is configured, the IP address should appear, and a nic router and nic drv button should appear in Leitzentrale as shown above.
4. Set up genodelabs repository
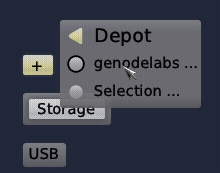
Now that we have a ram fs based depot available and network connectivity, let’s configure the genodelabs software repository. To do so, click on the + sign to add components to Leitzentrale and Sculpt OS.
+
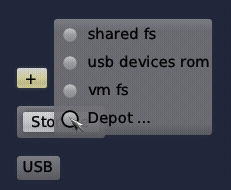
When you click on the + sign, 4 choices appear, shared fs, usb devices rom, vm fs, and Depot … The correct choice is Depot …, the others are something you would have needed to set up manually. Click on Depot…
+->Depot...
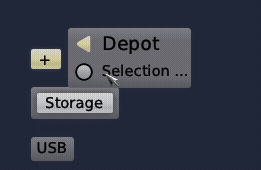
When you click on Depot… before having added any repos, Selection… appears as the only choice. Click it.
+->Depot...->Selection...
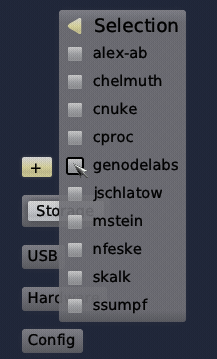
Now, a number of available repos is shown. We will stick to genodelabs for this note, the others are people at genodelabs who have made their personal repos available. Click on genodelabs.
+->Depot...->Selection...->genodelabs
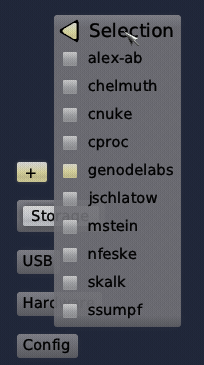
The progress of the download will appear briefly in the bottom left. After the repo is added, it will show as a filled in yellow box. This adds genodelabs to the Depot. Click anywhere outside of the dialog to close out the add component dialog.
5. Download a desktop background and configure it
With a software repository configured, we can download a desktop background and begin seeing what Sculpt and Genode have to offer.
First select the genode labs repository. Click on +, then Depot, then genodelabs
+->Depot...->genodelabs...
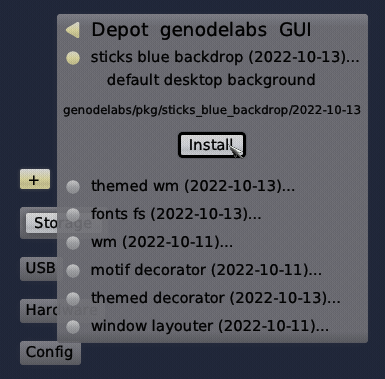
Now we see what categories of software are available to add to the system. In this case, we select GUI.
...->genodelabs->GUI

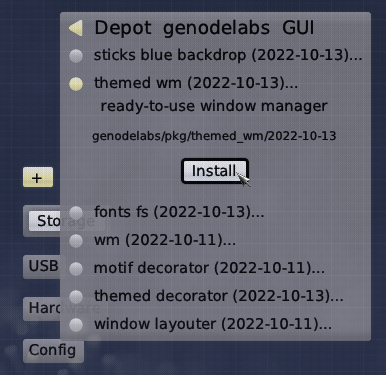
A number of GUI dependent applications are shown, we want the sticks blue backdrop. Select it.
...->genodelabs->GUI->sticks blue backdrop...

The dialog will change and the only option is Install, click the Button.
...->genodelabs->GUI->sticks blue backdrop...->Install
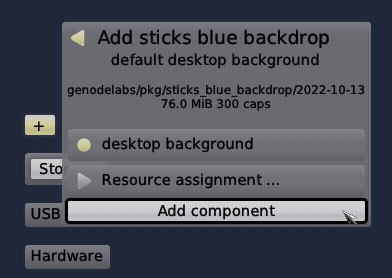
The package will be downloaded and installed to the ram fs and we will be presented with the configuration dialog for the application. The GUI configuration item shows 4 choices, system GUI server, desktop lock screen, desktop background, and keyboard focus. These are all capabilities present in the Genode framework and are part of the trusted computing base. At this point, we are being asked which capability we want the sticks blue backdrop application to have access to. The obvious choice is the right choice, desktop background. Select it.
...->sticks blue backdrop...->GUI->desktop background
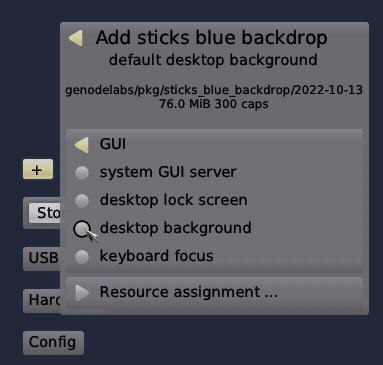
After selecting the capability, GUI will be replaced by the capability and show as a filled yellow circle. and we can add the new component by clicking on Add Component.
...->sticks blue backdrop...->Add Component
Take a moment to consider this. We have now extended the trusted computing base of our OS. We have added the desktop background and given it permission to serve as our background by adding the capability. Not too much exposure, for sure, but the surface has been extended. This is made explicitly visible in Leitzentrale - see that sticks blue background has been added to the GUI node.
Take note of the fact that we see the background through the Leitzentrale. To remove the Leitzentrale from view and see Sculpt OS with our desktop background in all its glory, press F12 to toggle Leitzentrale off.
F12
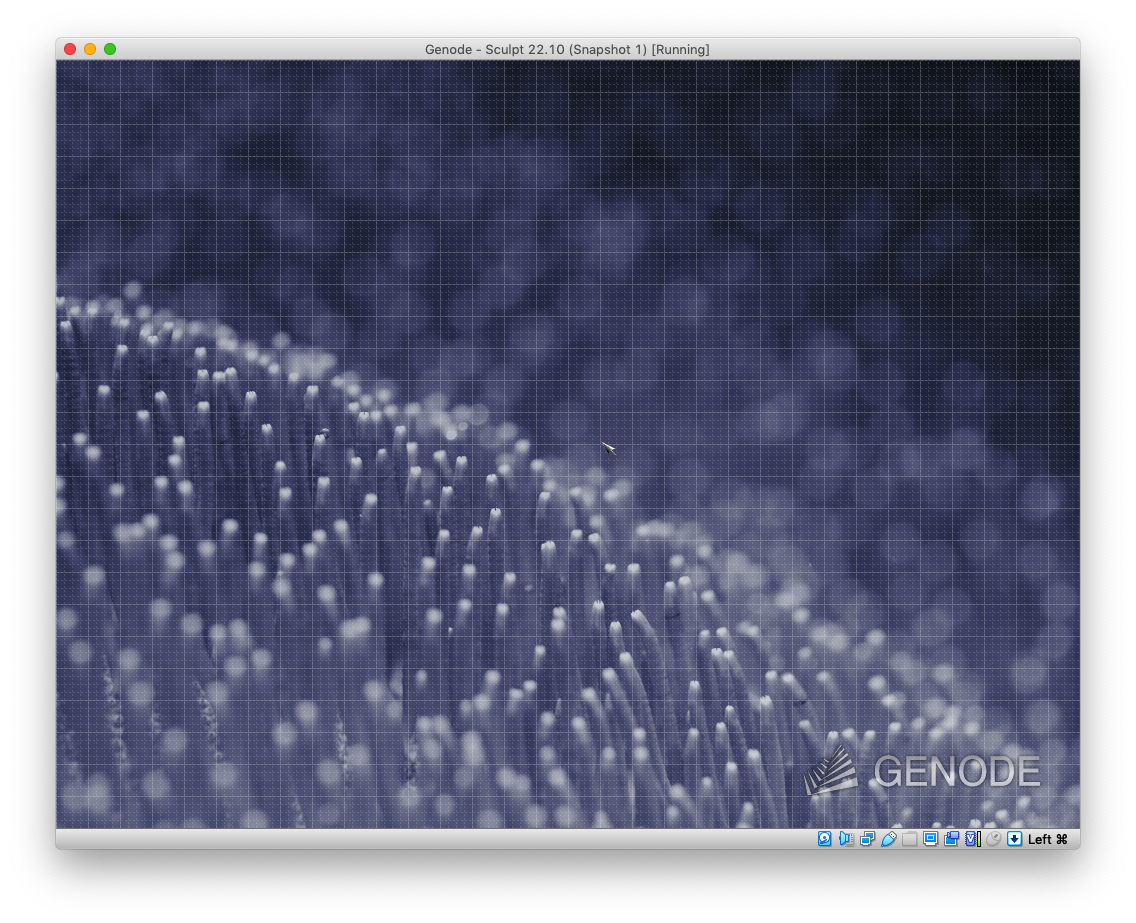
Press F12 again to toggle Leitzentrale on again and continue on in the note.
6. Download a window manager and configure it
A desktop background with a configured ram fs, nic, and depot make for a pretty paltry os. Let’s start adding some truly useful components. Let’s begin by adding a window manager to make windows pretty and functional. I will not show images for as many intermediary steps from here on out, but only those that are particularly informative, but I will describe every step.
Navigate to the list of GUI applications for genodelabs.
+->Depot...->genodelabs...->GUI
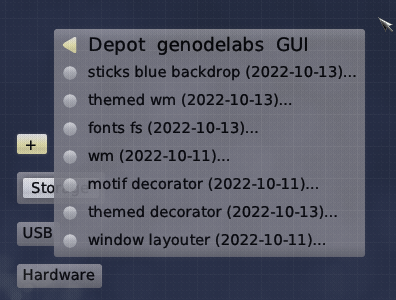
Here we see our desktop background and several other choices. Pick themed wm…
+->Depot...->genodelabs...->GUI->themed wm...
Click Install.
...->themed wm...->Install
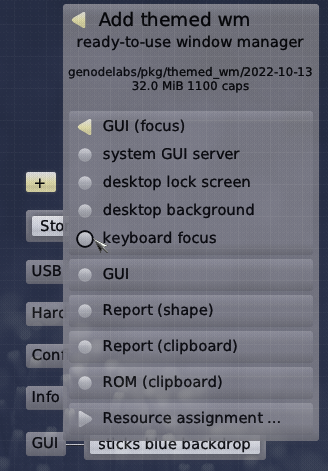
Configure the capabilities we want to expose to the window manager (just know that we only trust this component because we trust genodelabs). I will show the first two and then describe the others.
Select keyboard focus for the GUI (focus) capability. We want the window manager to handle the keyboard focus.
...->GUI (focus)->keyboard focus
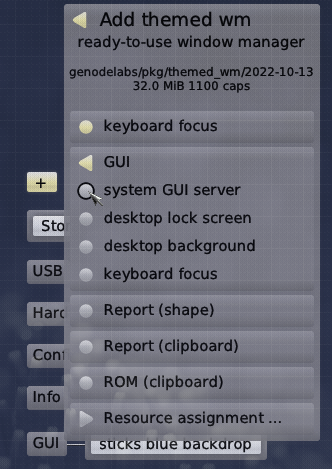
Select system gui server for the gui capability. We want the window manager to work with the system GUI server to do its thing.
...->GUI->system GUI server
Select pointer shape for the Report (shape) capability in order to control the mouse pointer, global clipboard for the Report (clipboard) to be able to write to the global clipboard, and global clipboard for the ROM (clipboard) capability to be able to read the global clipboard.
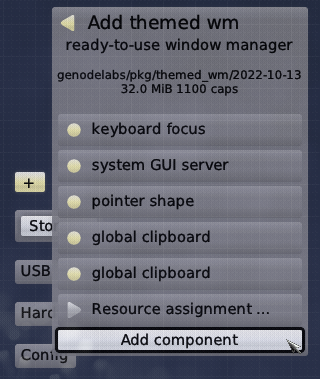
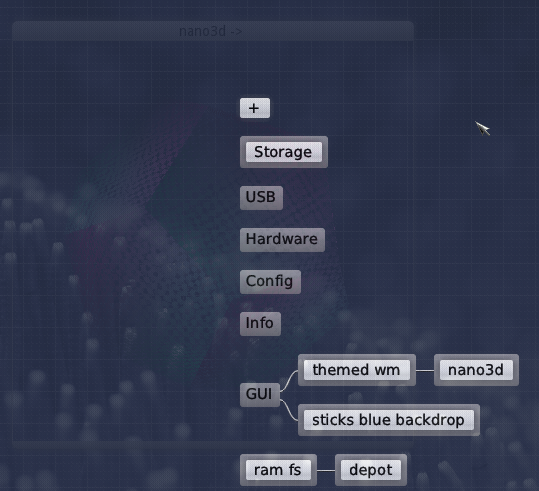
Our component view has been affected and a themed wm node added to the GUI node.
7. Download a demo and configure it
Now that we have a window manager, let’s get an app to run a window. In this case we will get the nano3d demo.
This time, I will be even terser with the explanation. Click the add component button, select Depot, then genode labs, then demos.
+->Depot...->genodelabs...->Demos...
Pick nano3d and click the Install button to install it.
To configure the application, select GUI and themed wm as the GUI capability.
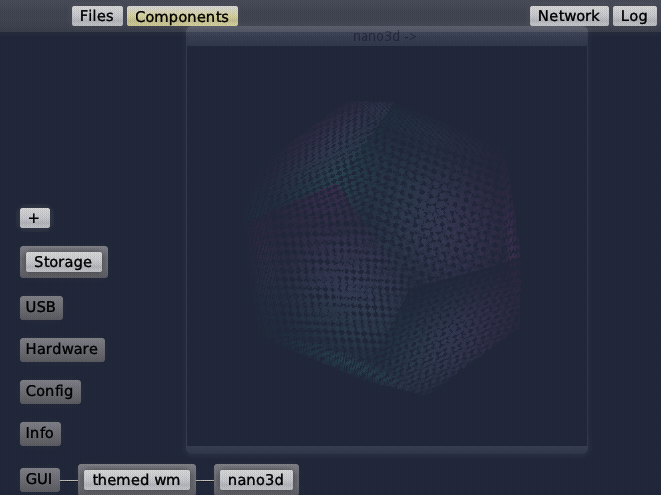
nano3d->GUI->themed wm
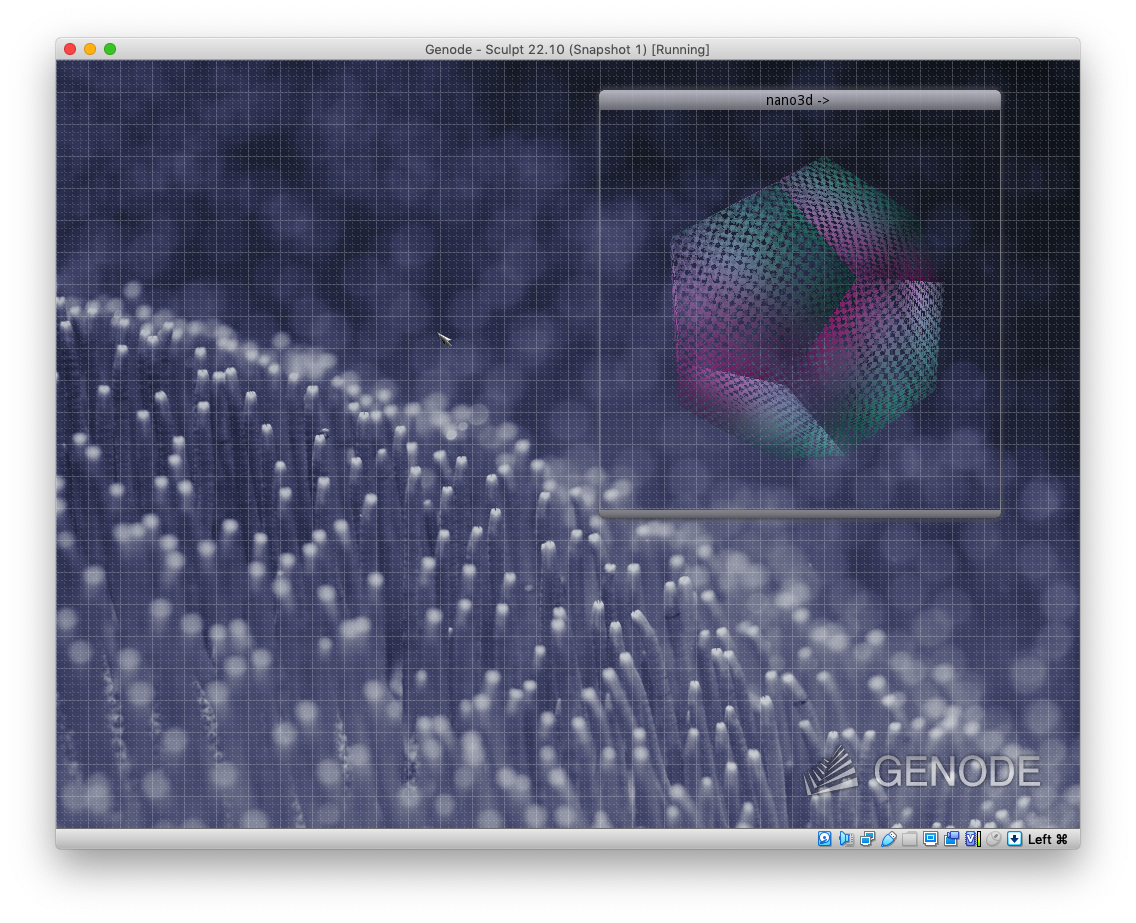
Click Add Component to add the component into our Sculpt’ed OS. You will see it running behind Leitzentrale and that nano3d has been added to the themed wm node.
Toggle Leitzentrale with F12 to see nano3d running in Sculpt OS under the control of the themed wm.
F12
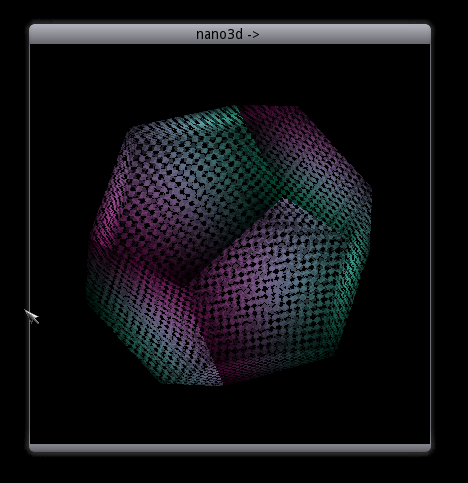
Just for fun, let’s remove the background to get a clearer look at the demo.
Press F12 and in Leitzentrale, click on the sticks blue backdrop node, and select Remove.
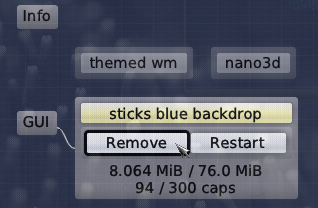
This results in the backdrop node being removed.
Press F12 to toggle Leitzentrale and see the demo without the distraction of the background, feel free to move it around and see the wm do its magic.
F12
When you get tired of it, press F12 again, and remove nano3d. By the way, any component you remove is still available without your having to redownload it, just navigate to it again and it will skip the download and just ask you to reconfigure the capabilities.
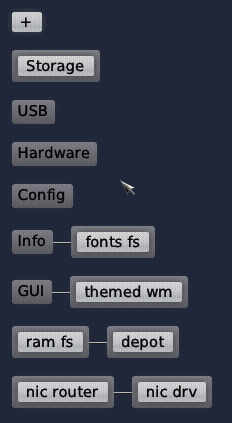
8. Download a fontfs and configure it
We need a fontfs as a dependency of the next step. Even terser.
Install the font fs by adding the component.
+->Depot...->genodelabs...->GUI...->font fs...
Then select system font config as its ROM (config) capability and Add the component into our Sculpted OS. The added node will be attached to the info node and its only capability will be reading the system font configuration information - not much security risk there.
The result will appear as follows
9. Download a unix-like system shell and configure it
Now, let’s add a real and useful application to our OS. The system as delivered comes with a simple shell. To access that shell, click ram fs and inspect. When you do so, the Leitzentrale will add in a new node into the top row of buttons, called inspect.
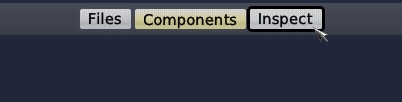
Click it and the inspect shell will be revealed.
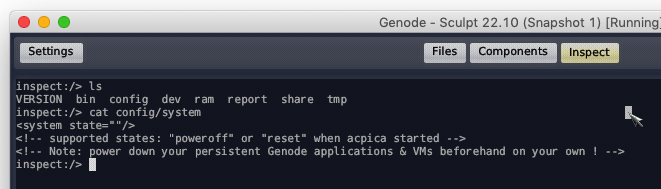
Carefully look around and when you’re done, click the Inspect node to return to the Leitzentrale.
To remove the Inspect capability, just click on ram fs, then Inspect and it will be removed (the button, which was yellow after you enabled it, will return to the normal gray).
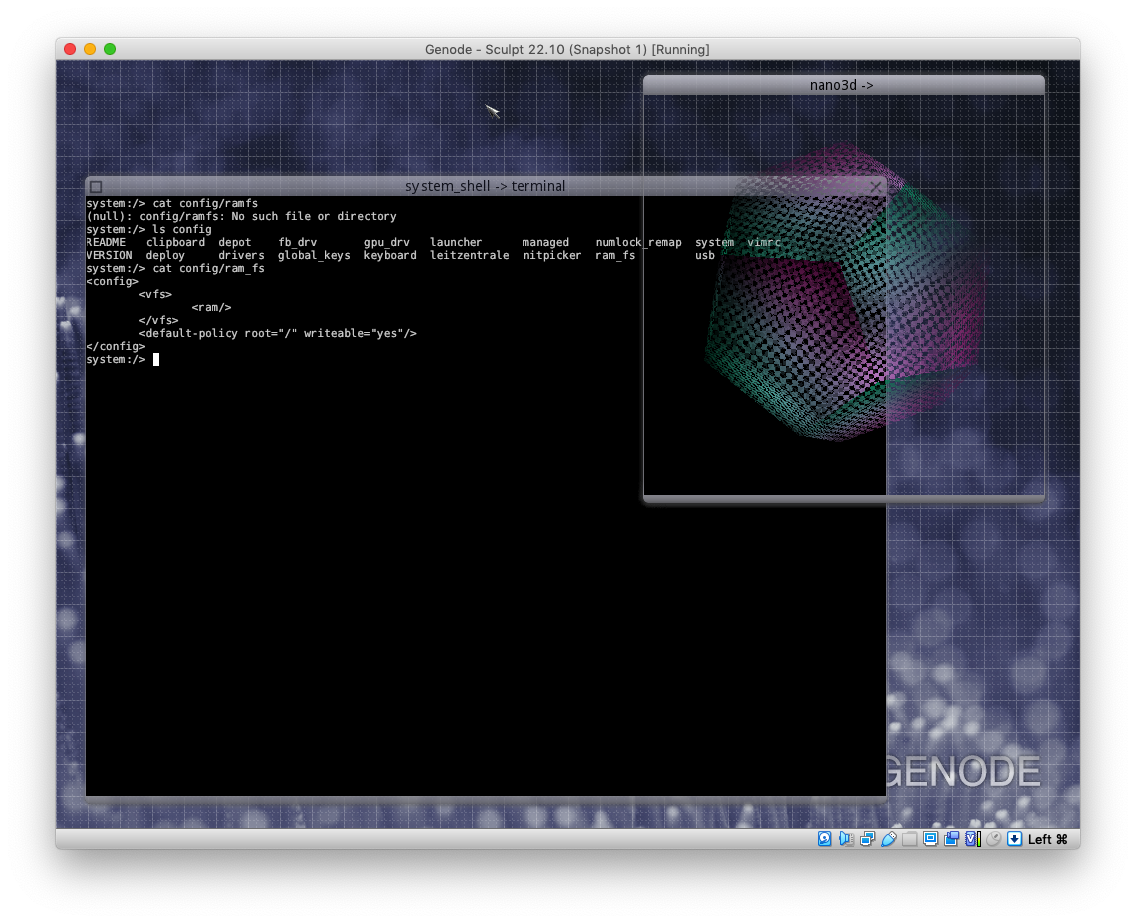
The inspect shell is useful for a number of system related tasks, but a more powerful shell that offers up a larger number of unix-like tools, is what we’re after. Tersest yet on the instruction front.
+->Depot...->genodelabs...->Tools...->system shell...
- themed wm
- writeable system configuration
- read-only system reports
- ram fs
- fonts fs
- default vim configuration
- themed wm
- themed wm
- custom virtual memory objects
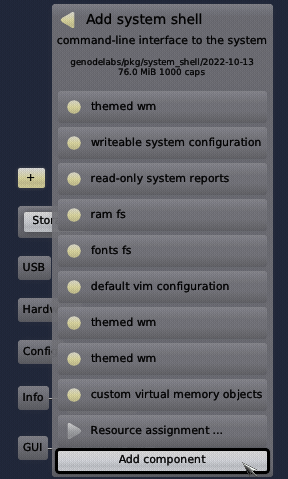
Add the component and it will appear behind Leitzentrale. Press F12 to reveal it and play with it in sculpt. A couple of observations, the system shell component is running in the wm, it runs in a window. The inspect shell was part of Leitzentrale and did not have a window per se.
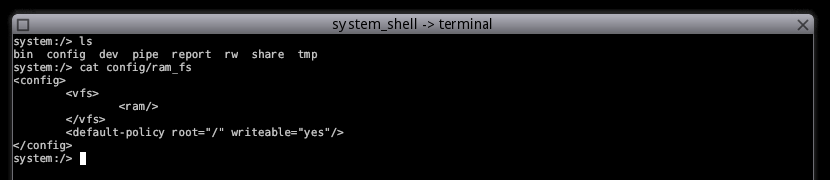
Also, if you close the window and return to Leitzentrale, you can click on the system shell node and click Restart to restart the shell.
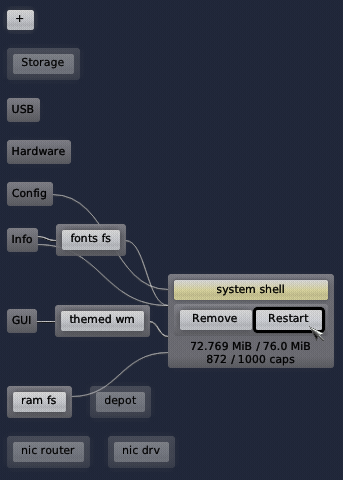
Here is what the nodes look like now
10. Celebrate a job well done
The note has led you through a basic tutorial of how to start using Sculpt OS. Sculpt OS is built on the Genode Operating System Framework. It allows you, the user to exert fine-grained control over your operating environment. By placing new applications into the environment with care you can be assured that your components execute in a trusted computing base that is fairly minimal and severely limit the amount of attackable surface area you expose.
Shutting down
Well, here you have kindof caught me out. I don’t really know how to shut this thing down. I’ve asked on the genode mailing list, but I still haven’t quite figured it out.
So, in lieu of a better approach, we will reset Sculpt and sneak in a power off while it’s rebooting :).
In either Inspect shell or System Shell, vim config/system and change the system state to “reset”
<system state="reset"/>
When you write the changes ESC:wq, the system will reboot, power off the VM before it restarts (Ignore the fatal keyboard error)!
I’ll prolly update this note over time, but I wanted it out there while it was still fresh.
Ciao!
post last updated 2022-12-29 11:53:00 -0600