Setting up Slackware 15 on T430 for X Window Programming
The note walks through the process of installing and configuring a working Slackware 15 64 instance with the packages mirrored locally for ease of access and eliminating the need to be online as much. When the system is up and running it provides xdm services to nearby hosts (those on the local network). This makes running and testing x window clients simpler and more interesting. You may notice that the note references other environments that you may not have or want to use (MacOS Mojave and FreeBSD 13.1). Just ignore those references as they are not strictly required.
I chose Slackware 15 64 as the environment after trying out various flavors of Debian, Arch, Kwort and others. While these worked ok, they did not provide much of a clean, vanilla x experience. Slackware, on the other hand, provided a sane, simple, and understandable x environment that was pretty vanilla :). It feels really good to get back to Slackware and its simplicity. I don't have a gazillion processes running doing who knows what, the laptop sleeps without crazy interventions, and stuff works well. That said, Slackware is not for the faint of heart. You should be somewhat familiar with Linux and it's command line interface and be willing to do your own research before jumping into it.
Scenario
The system being exercised here is a Lenovo Thinkpad T430 running Slackware 15 64 in a heterogeneous network of machines running FreeBSD 13.1, TrueNAS Core 13.0-U3.1, MacOS Mojave 10.14.6, Windows 10, Debian 11.6 Bullseye, and others. The goals are:
- Get X, twm, and xdm running on the T430.
- Have the T430 provide xdm login capability to the Mac
- Have the T430 display clients on the Mac using
-displayoption
Requirements
Other than the mentioned downloads, the only hard requirement is that XQuartz be installed on the Mac and not currently running when starting X with the -query option. Having a FreeBSD 13.1 memstick around just makes sense, but isn't absolutely required.
Resources
- Slackware website - http://www.slackware.com
- Slackware Download Mirrors - https://mirrors.slackware.com
- Slackware Documentation - https://docs.slackware.com
- Linux Question Slackware Forum - https://www.linuxquestions.org/questions/slackware-14
Note: The documentation seems to be in a constant state of not-up-to-date-ness. To my eye, it looks like there was some kind of turf battle early days, now it looks like no one really maintains it. Contrast this with FreeBSD's Handbook, or Arch's wiki, and it pales by comparison. Which is sad, since Slackware, even moreso than FreeBSD is bounded and contained and doesn't try to be everything to everyone or provide 100 different ways of doing one thing.
Getting Ready
Download the ISO and verify it
mkdir -p ~/_workarea/_CD_DVD/iso/slackware-15.0
cd ~/_workarea/_CD_DVD/iso/slackware-15.0
aria2c https://mirrors.slackware.com/slackware/slackware-iso/slackware64-15.0-iso/slackware64-15.0-install-dvd.iso
aria2c https://mirrors.slackware.com/slackware/slackware-iso/slackware64-15.0-iso/slackware64-15.0-install-dvd.iso.asc
aria2c http://slackware.com/gpg-key
gpg --import gpg-key
gpg --verify slackware64-15.0-install-dvd.iso.asc
Burn the ISO using balena etcher
Clean up the EFI List
This is an optional step.
I do it because I get tired of seeing old boot entries lying around. Unfortunately, the Slackware live installer doesn't provide the needed tool efibootmgr in the default install mode. Send me an email, if you know how to do this from the installer without jumping through hoops. In the meantime, I just boot to a FreeBSD 13.1 memstick image I have laying around.
Boot the T430 using the FreeBSD 13.1 memstick on USB
- Press F12, select USB
- Press 2 single user mode
- Press enter to execute the default shell
- List out the boot entries using
efibootmgr - Delete any unwanted entries using
efibootmgr -B -b 00XXwhere 00XX represents the entry to delete - Reboot and insert the Slackware USB
Boot the Slackware USB
- Press F12, select USB
- Press Enter to Select Slackware 15.0 huge.s kernel
Installation
Choose keymap, login as root, prepare drives
-
Press Enter to leave US as keymap
-
Login as root with no password
-
Zap existing partition info (I use gdisk's expert zap function to do this on my two drives)
gdisk /dev/sda gdisk /dev/sdb x, z
* Partition target disk (I put Slackware onto my ssd */dev/sdb*. Just use `fdisk /dev/sdb`

   * Create a new 1G EFI partition and mark it active
   * Create a new 16G Swap partition
   * Use the rest as a Linux partition

### Run setup as root

`setup`

* Choose configure swap - */dev/sdb2* (with no bad block check)
* Configure / - */dev/sdb3* as ext4 on */* (quick, no bad block check)
* Configure EFI - */dev/sdb1* as the EFI partition
* Select install from a Slackware USB stick - let it detect your USB
* Unselect emacs, kde, and xfce (This system hearts `vi` :) and kde and xfce aren't needed - we'll use twm)
* Choose terse mode - lots of interesting output to ignore or read

This will take a bit...

* Skip making usb stick
* Skip lilo and move on to elilo
* install elilo - let it install a boot menu item
* Choose install imps2
* Choose yes to gpm
* Configure network
   * host - *astra*
   * domain - *sentech.home*
   * Answer no to vlan
   * Answer yes to network manager
* Choose default services
   * atd
   * crond
   * fuse
   * messagebus
   * syslog
   * sshd
* Choose NO to trying out fonts
* Set TZ info
   * utc
   * us-central
* Choose vim
* Choose xinitrc.twm
* Set a root password
* reboot

## First boot

* Configure visudo to allow wheel users to execute without password - nuts, right? Don't do this without considering the ramifications.

   * login as root
   * run `visudo`
   * uncomment wheel with no password line

* Add a wheel user

   * run `adduser` enter details, add user to *wheel* group, and enter and confirm password
   * logout and back in as the user

* Set up wifi - xref [https://www.makeuseof.com/connect-to-wifi-with-nmcli](https://www.makeuseof.com/connect-to-wifi-with-nmcli)
sudo -i nmcli --ask dev wifi con SSID
disable ipv6 nonsense, or be prepared for 5 second lag on lookups
nmcli con mod SSID ipv6.dns-options single-request nmcli dev reapply wlan0 ping yahoo.com
sudo -i ip addr 192.168.254.21
* Test twm with `startx`

* Test ssh with `ssh astra` from remote host

* Git rid of bracketed paste (who thought bracketed paste was a good idea?)

    As both user and root

    `echo 'set enable-bracketed-paste off' >> ~/.inputrc`

* Setup a basic vimrc

    As both user and root

    ```
vi ~/.vimrc
set ts=4
set ruler
syntax off
set conceallevel=0
"filetype plugin indent on
"map q <Nop>
set mouse-=a
-
Update hosts file with
sudo vi /etc/hosts... list of ips and hosts -
Configure graphical logon (xdm)
-
Slackware goes down the list in rc.4 to choose the display manager - gdm, kdm, sddm, and xdm, to enable/disable the ones you don't want to use, either remove them or their execute permissions, e.g.
sudo chmod a-x /usr/bin/sddm -
edit inittab to start in graphical mode
-
sudo vi /etc/inittab
3 - console, 4 - graphical
id:4:initdefault
   * test runlevel 4 before rebooting using `sudo -i init 4`

* Set up local mirror of Slackware 15 64 Repo (~11GB)
sudo -i
vi /root/slackmirror #!/bin/sh TARGET=/ MIRROR=rsync://slackware.uk rsync -4 -rlpt --delete -P -H $MIRROR/slackware/slackware64-15.0 $TARGET
chmod u+x ~/slackmirror ~/slackmirror
It will take a bit to download the repo. Have coffee. Rerun whenever you like, or when there's a security issue - [http://www.slackware.com/security](http://www.slackware.com/security)

* Add the local mirror
vi /etc/slackpkg/mirrors file://slackware64-15.0
* Create a blacklist of packages not to include in updates
vi /etc/slackpkg/blacklist
append
e/ kde/ xfce/ kernel-generic.* kernel-huge.* kernel-modules.* kernel-source
* Update the system from the mirror
get the gpg key for slackware
slackpkg update gpg
update the package list
slackpkg update
check for new packages
slackpkg install-new
upgrade the packages
slackpkg upgrade-all
Let it overwrite the configuration files unless you've already customized them...

* Upgrade the kernel - xref [Slackware Security Advisories](http://www.slackware.com/security)

As of Feb 22, 2022, the available kernel is linux-5.15.94, if it's been awhile, it will change. Use the latest, if you like. To see what's been mirrored just `ls -ld /slackware64-15.0/patches/packages/linux-*`
backup the existing kernel
cp /boot/efi/efi/Slackware/vmlinuz-huge-5.15.80 /boot/efi/efi/Slackware/vmlinuz-lkw
cd /slackware64-15.0/patches/packages/linux-5.15.94/
check sigs
for i in *.asc; do gpg --verify $i; done
upgrade the kernel
upgradepkg kernel-*.txz
generate initrd
geninitrd
check symlinks - they should point to 5.15.94 images.
ls -l /boot
copy images from /boot /boot/efi/efi/Slackware
cp /boot/initrd.gz /boot/efi/efi/Slackware/ cp /boot/vmlinuz /boot/efi/efi/Slackware/ cp /boot/vmlinuz-generic /boot/efi/efi/Slackware/
edit elilo.conf
vi /boot/efi/efi/Slackware/elilo.conf prompt timeout=30 default=generic
default linux kernel
image=vmlinuz root=/dev/sdb3 label=vmlinuz read-only append="vga=normal ro" description="Default Linux Kernel"
generic linux kernel
image=vmlinuz-generic initrd=initrd.gz root=/dev/sdb3 label=generic read-only append="vga=normal ro" description="Generic Linux Kernel"
last known working linux kernel
image=vmlinuz-lkw root=/dev/sdb3 label=lkw read-only append="vga=normal ro" description="Last Known Working Linux Kernel"
* reboot

## Second boot

* Get rid of any leftover cruft using `slackpkg clean-system`

* Serve up XDM to remote clients

   * Start a tail of xdm log using `tail -f /var/log/xdm.log`
   * Configure XDM for remote queries
      * Copy xinitrc as initial   .xsession
      `cp /etc/X11/xinit/xinitrc ~/.xsession`
      * Edit the bits after the xmodmap
set a black background, fix middle button issue
so CTL-Button 2 brings up Xterm VT Options menu
xsetroot -bitmap /usr/include/X11/bitmaps/black xinput set-prop 'TPPS/2 IBM TrackPoint' 'libinput Scroll Method Enabled' 0 0 0
start some useful programs
/usr/bin/twm & /usr/bin/xclock -geometry 100x100-1+1 & xterm -g 96x24-0-0 & xterm -g 80x32-140+0 & exec /usr/bin/xterm -g 80x58+0+0 -name login
* Alternatively, create minimal .xsession as user
vi ~/.xsession #!/bin/sh xterm & twm
* Give execute permission to the .xsession file using `chmod u+x .xsession`

* Modify the Xaccess file to allow any host to query
vi /etc/X11/xdm/Xaccess add * as last line *
* Modify the xdm-config file to allow querying
vi /etc/X11/xdm/xdm-config !DisplayManager.requestPort: 0 !DisplayManager.*.authName: MIT-MAGIC-COOKIE-1
* Modify sshd_config to allow X11Forwarding
sudo vi /etc/ssh/sshd_config X11Forwarding yes
sudo /etc/rc.d/rc.sshd restart
* Enter runlevel 3 and reenter runlevel 4 for changes to take effect
sudo -i init 3
... wait a sec for it to enter the runlevel
sudo -i init 4
If you get respawn issues, just `reboot`.

* Test x from remote x windows server
ssh -Y astra xeyes
* Test xdm
Stop any running instances of XQuartz, then set some sane preferences
* Input->Option keys send Alt_L and Alt_R - lets your alt key be meta
* Ouput->Full-screen mode (needed for xdm and twm to treat your mac like an X display, otherwise, windows look and act like mac windows)
* Output->Auto-show menu bar in full-screen mode - just makes it easier to enter and exit the X window environment
* Pasteboard - check everything, it helps with cutting and pasting between X windows and Mac Windows
* Windows->Focus on New Windows - why not?
* Security->Authenticate connections - required for network clients
* Security->Allow connections from network clients - otherwise -display from astra won't work
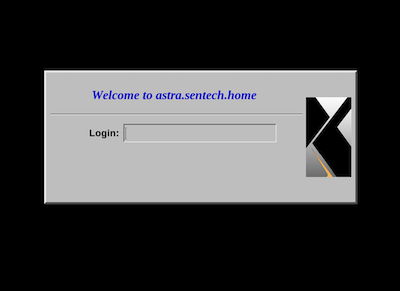
Fire up X on the mac using `X -query astra` from nebula. Switch X to full screen by pressing *Command-A* after clicking on the XQuartz icon in the dock.

Note: if you see: xdm error (pid 1559): Cannot convert Internet address 192.168.254.25 to host name, it means you don't have a hosts entry for the ip, add it, if it just returns - make sure you actually typed X -query astra :)
## Bonus information
xref - [https://unix.stackexchange.com/questions/736030/how-can-i-display-xeyes-on-a-remote-host-without-using-ssh](https://unix.stackexchange.com/questions/736030/how-can-i-display-xeyes-on-a-remote-host-without-using-ssh)
This section describes how to use `-display` to get an xclient running on the Slackware machine to display on a remote system (a mac), that is get `xeyes -display nebula` working from astra. To display on nebula, the MacOS Mojave machine, from astra, the Slackware 15 machine, requires a handful of steps:
* In XQuartz preferences, uncheck Ouput->Full-screen mode (we actually want windows, this time)
* Restart XQuartz
* Obtain the MIT-MAGIC-COOKIE-1 from nebula
* Add it to astra's xauth list
* Run the client from astra and it will display on nebula's screen
Here are the details:
To see how X was started, run `ps aux | grep X`:
`user 96691 0.0 0.0 4279568 5012 ?? S 12:39PM 0:00.01 /opt/X11/bin/Xquartz :0 -nolisten tcp -iglx -auth /Users/user/.serverauth.96532`
The key point to note, is the **-nolisten tcp** and **-auth** options. These indicate respectively, that the X server isn't listening on TCP and that connections to the X server require authentication.
Changing the preferences in XQuartz to allow network connections and restarting it result in the following change:
`user 97993 0.0 0.0 4279568 5004 ?? S 2:08PM 0:00.01 /opt/X11/bin/Xquartz :0 -listen tcp -iglx -auth /Users/user/.serverauth.97835`
Now, XQuartz is listening on TCP, as indicated by `-listen tcp`
To obtain the magic auth cookie from nebula, on nebula, or via remote login, run `xauth list` and find the correct cookie:
`nebula:0 MIT-MAGIC-COOKIE-1 240800a1f435f70d92f8f8c706eeb547`
On astra, add the cookie to the xauth list, using:
`xauth add nebula:0 . 240800a1f435f70d92f8f8c706eeb547`
If all went well, you should now be able to run xeyes from astra:
`xeyes -display nebula:0`

Things to watch out for:
* XQuartz needs to be running :)
* The cookie needs to be up to date. It will change.
* There is a dot in the xauth add command that is required.
Link to high res image of xdm login on the mac being served up by slackware xdm:
* [two](/assets/img/t430/02-big.png)
Reach out to me if you find any issues or have suggestions.
\- will
*post last updated 2023-02-22 16:20:00 -0600*